Tips & Ticks
Time Saving
Features
There are several new time saving features in 2020 Design. This will outline some of them. If you’d like to see more tools, click on HELP in 2020 Design.
Helpful Quick Tools
Wall Properties
When you right click on a wall and click on Properties, you can set a Top Align height for that wall.
User Dimensions
It’s much easier to dimension in 2020. You can click on Dimensions and select the type of dimension you want. You can also turn on the toolbar (click on View > Toolbars…> and check on Dimensions, then place it where you like.) You’ll now get a snap point to select when you want a dimension, and you can only dimension what is active on the layer.
Coords Tab
Sometimes used to enter in values and dimensions for placement for greater accuracy.
Move Tab
Using the move tab, you can type in the offset you want and move the selected item or group of items and then click on the arrow in the direction of your choice. This is great for shifting islands over.
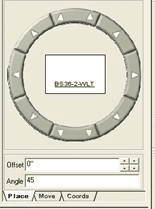
New Edit Box
Place Tab – By selecting a reference item on the floor plan so that it appears with the blue boxes around it, you can select a separate item from the catalog list and use the Arrows to place the new cabinet in the direction in reference to the original item. You can also enter in an Offset Value that can help when you want to leave 24” of space for the Dishwasher for example.
Drawing Layout
Now you can click on View > Show Drawing Layout to select from several different templates to show more then one picture on a page. You can now have a small vanity floor plan, picture, and countertop detail in one drawing. Please see me if you’re interested in learning how to work with this.
Helpful Quick Tools
Wall Properties
When you right click on a wall and click on Properties, you can set a Top Align height for that wall.
User Dimensions
It’s much easier to dimension in 2020. You can click on Dimensions and select the type of dimension you want. You can also turn on the toolbar (click on View > Toolbars…> and check on Dimensions, then place it where you like.) You’ll now get a snap point to select when you want a dimension, and you can only dimension what is active on the layer.
Drawing Layout (formally Multiview):
Now you can click on View > Show Drawing Layout to select from several different templates to show more then one picture on a page. You can now have a small vanity floor plan, picture, and countertop detail in one drawing. Please see me if you’re interested in learning how to work with this.
Coords Tab
Sometimes used to enter in values and dimensions for placement for greater accuracy.
Move Tab
Using the move tab, you can type in the offset you want and move the selected item or group of items and then click on the arrow in the direction of your choice. This is great for shifting islands over.
New Edit Box
Place Tab – By selecting a reference item on the floor plan so that it appears with the blue boxes around it, you can select a separate item from the catalog list and use the Arrows to place the new cabinet in the direction in reference to the original item. You can also enter in an Offset Value that can help when you want to leave 24” of space for the Dishwasher for example.
Drawing Layout (formally Multiview):
Now you can click on View > Show Drawing Layout to select from several different templates to show more then one picture on a page. You can now have a small vanity floor plan, picture, and countertop detail in one drawing. Please see me if you’re interested in learning how to work with this.
Additional Quick Tools

These icons listed below are located in the bottom right hand corner of your screen can either help or hinder your design. They can be turned on and off at any time as necessary.

In-Out/Up-Down
When moving or duplicating an item, this button controls whether or not any changes made to the cabinet’s position remains the same or if it follows the default placement rule. I recommend leaving it clicked on.

Collision
When on, items will ‘bump’ into each other. When off, items can be placed ‘overlapping’ one another. I recommend having this on. If an item needs to collide, i.e. a panel into a wall, you can click this off or hold the CTRL key down while moving the item.

Area Snap
This will only allow items to move in a set increment (previously set in Preferences.) I recommend having this clicked off.

Item Snap
This will allow items to snap together when they get in close proximity. I recommend having this on. If an item needs to be placed close, but not snapped together, you can click this off or hold the Shift key down while moving the item.

Ortho
Useful when adding lines, Ortho on will only allow line to draw at 45 degree increments. This is really handy when drawing a mirror reference line when 90 degree is critical. Other then that, I recommend leaving it off until you need the precision.

Link
Just like in Edit Shape, this will keep wall together when doing a quick edit. Leave it on until necessary.